
Hi, I’m Ali Forelli, a Program Manager working on Accessibility in Microsoft Word. With Mac OS 10.14 (Mojave), Apple added increased functionality to Rotor Navigation for VoiceOver. I’m pleased to announce that starting with Office 16.29, Microsoft Word now supports Rotor Navigation for links, tables, and headings within documents!
What is Rotor?
The Navigation Rotor is a MacOS VoiceOver feature to aid in contextual navigation of different content types for visually impaired users. It can be accessed via the keyboard or through gestures. This post will cover the keyboard navigation for Rotor use in Word. For more information on gestures, refer to Apple’s help article: https://www.apple.com/voiceover/info/guide/_1137.html#vo28035
How it works
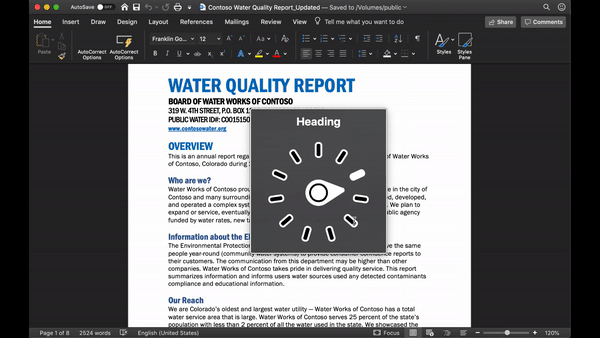
To turn on VoiceOver, press Command-F5. Once VoiceOver is enabled, you can access Rotor Navigation by pressing Command-Caps Lock-Left or Right Arrow to navigate between the Rotor options.
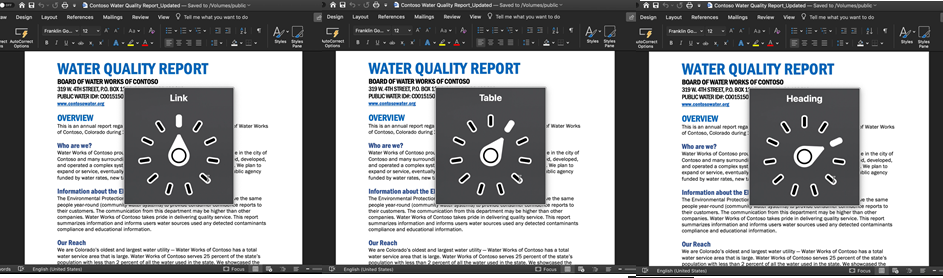
Within Word, you can choose Links, Tables, or Headings from the Rotor. Once you have navigated to your selection, use Caps Lock-Up or Down Arrow to move between the items of that type in your document. For example, to navigate by tables, press Command-Caps Lock-Right Arrow until the selection reads “Table” then release the keys and press Caps Lock-Down to move your cursor to the next table in your document.

Content list
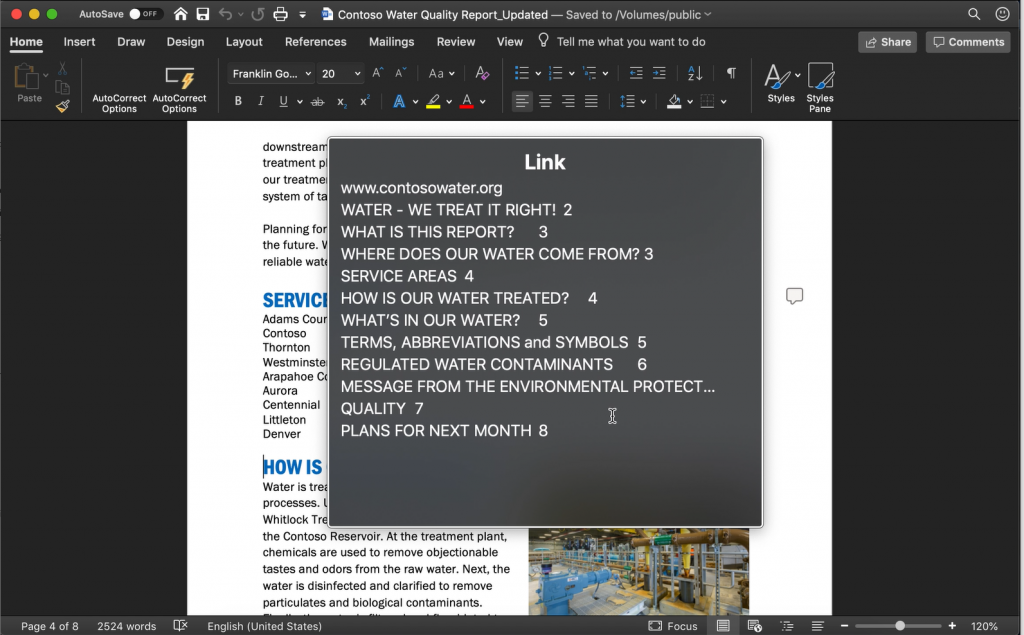
You can also generate a list of each type of content in your document by pressing Control-Option-U. Using this command will bring up a list of items for the current Rotor selection. If you were navigating by link, Control-Option-U would bring up a list of links, and you can use the Up or Down Arrow keys to navigate the list, and press Enter to close the list menu and jump to that cursor position in the document.
You can also type while the list of links, headings, or tables is open, and your character input will automatically search the list for text you enter. In the example below, if you were looking for the “Quality” link, you could use Rotor selection to navigate by link, then press Control-Option-U to open the list of links. When the list of links has been generated, use the Down Arrow to navigate to item 7, or start typing “Quality” to generate a search list of links that contain the word “Quality”.
How did navigation work before?
Before Rotor Navigation, you would jump between links or tables in Word with Control-Option-Command-L and T, respectively. Heading navigation was possible in Safari, but not in Word. Now, with Rotor support, you can move by these three content types in a much more efficient way as well as expose a list of each type of content for easy search and navigation.
Feedback
If you have any feedback or suggestions, you can submit them using the Help Improve Office (😊) button in the top right corner of Word.
Learn what other information you should include in your feedback to ensure it’s actionable and reaches the right people. We’re excited to hear from you!
Sign up for the Office Insider newsletter and get the latest information about Insider features in your inbox once a month!